Showing posts with label Energa. Show all posts

22 June 2021

Still Life


Just having some fun with the camera and making arrangements.  Trying stuff out.

There's things that don't show, but I know they're there.  Like removing the M7 bayonet and putting an FAL one in its place.  Like putting an FN magazine pouch to replace the 1911's.

Heck, you can't hardly tell there's a Browning in that holster.

Plus that's a real grenade launching blank there.

21 June 2021

Better Markings

Got my paint stencils for the Energa today!


Much better and easier than the other way I did it!

16 June 2021

Masked


My buddy has cut a mask!  That will look so much better on the "good" print.

I might even do some filling and redo the markings on the "bad" print.

14 June 2021

R1M1 Markings Method 1 Test

This was done by painting the marking area yellow, applying some 1/4" Helvetica self-adhesive vinyl letters, spraying green over all that then peeling the letters back off.

It looks surprisingly authentic.


Method 2 is to have my buddy, Adam, make me a stencil mask to apply and then just spray the letters yellow.

On the real thing, they simply held a cardboard stencil with the correct markings up the grenade and sprayed.  Lots of runs and overspray on the real deal.  The South Africans were sloppy about this.

Update:

Did a bit of touching up.  It's better.


13 June 2021

Still Life With The Light Automatic Rifle

You did know that FAL stands for Fusil Automatique Léger right?  That's French for light automatic rifle, and something of a pun.

Léger and la guerre sound a bit alike, especially with a Belgian accent.

The Energas are looking durn good all painted up.  I need to find my stencils!

12 June 2021

Paint

I have decided that imperfections and voids are a good thing when you're making a rifle grenade marked like a live round.

I've yet to find my stencil set, so markings are still coming.


06 June 2021

Ready For Bondo

Got the Energa printed all out!


There's a couple of voids and imperfections (that's PerVECT!) that need filled and sanded, but it's looking damn good.

Then sickly gray green paint, then markings, then more pictures!

By the way, the grenade sights suddenly make intuitive sense when you've got a grenade (though it's hard to get everything aligned for the camera).  The curve of the grenade body is supposed to match the curve of the sight with body filling in the u-notch.

100m:

75m:

50m (and the best alignment with the sights):

PS: It came to 562g assembled.  Missed the target mass by 160g.  I can add weight, I have a hollow spot.

05 June 2021

Success

Got a successful tail print!

It even fits over the muzzle like it should!

There's a mysterious void on one side, need to fill that, but it's definitely within the range of tolerance for a cosmetic toy.

Printing of the nose has begin:


04 June 2021

Bracing Tail


It's going well.  But the previous attempt was going good at this point as well.  The big difference is we're braced for the wobble this time!

03 June 2021

Here We Go Again!

We almost made it too!

The version with the butresses made it all the way to the fins, but had wobbled enough to put a dog-leg in the tail tube.

It would have been salvageable, but the inside diameter of the tube is an interference fit with the FAL flash-hider.

So we redesigned the butresses to allow a weight to be placed directly on them to stop the wobble and added a 1/4 mm to the ID.

Krusty IS coming!


29 May 2021

Full Size Tail Section Take Two


We're hoping that the increase facet resolution and the support buttresses will let us get to the end this time!  This is four hours of printing, much quicker than the first attempt too.

Not Complete

The fins are giving us agita!

The print got up to them and it started getting all wobbly on JT!

Revised srt with support buttresses and FACETRES set from 0.5 to 10.

We're getting there and learning as we go!  Many of the comments have been helpful, I am not sure this is still the internet.

I also revised the fuse to make the angles look better.


28 May 2021

Nearing Completion

A finish time of 0100 is predicted.


Fuse Tip


 Just eyeballing the dimensions from the EOD manual...


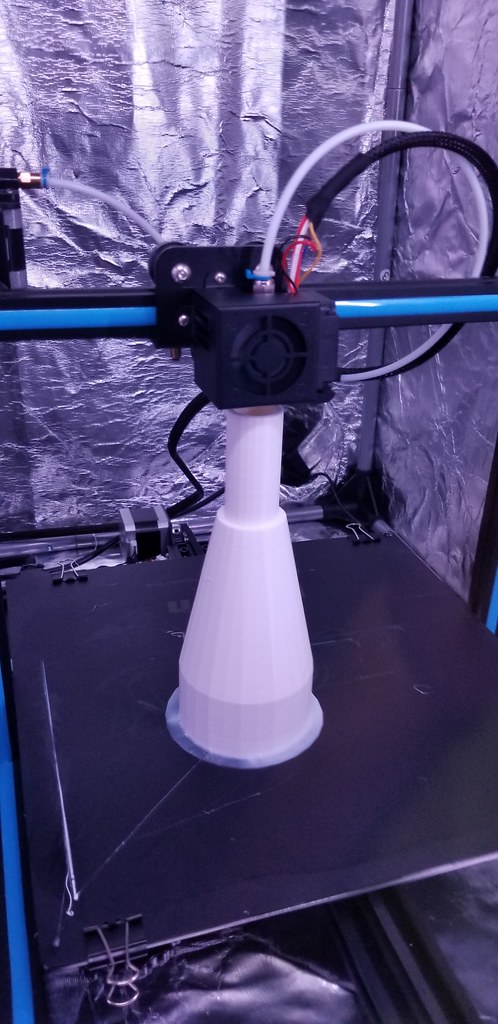
Looking Conical


We're uncertain why it's ended up polygonal instead of round.

27 May 2021

Afternoon Update

About 1/3 the length done, I think.

Blogger's photo insertion system is still on the blink.

Gestating Well

We're getting there!  This is from 8am.

Also, it pays to know some html when Blogger's interface for posting a pic barfs.

26 May 2021

Just Keep Swimming

We're into the taper to the tail support tube!


Fusing

I found the EOD manual on the M28 rifle grenade and it has enough drawings to make a detailed model of the fuse!


Even better, a decent image of the shipping cap.


 To the CAD program!

Happily, the fuse is a teeny thing and a relatively quick print.

Thanks to relentless searching on the various engines...

I now know what is supposed to be painted on it.

Dark green overall.

Red stripe about where the nose cone meets the cylinder portion.

Yellow letters saying:

GRENADE RIFLE 75mm

HEAT R1M1

RDX/WAX               95/5

B21            A            3/72

The 95/5 is the percentages of RDX to wax.  B21 and A are ordnance codes.  3/72 is the manufacturing date.

Prolly going to end up making two Energas, one with the South African ringed tail, the other with a six fins.  I think I'll see if I can find the markings for an M28 HEAT round.

25 May 2021

It's Getting Taller

Schrodinger's Rifle Grenade is making progress!